BK7238 universal AT commands integrate functions commonly used by users, aiming to lower the threshold for customers to use products and improve the efficiency of products from research and development to mass production. The AT instruction set provides two types of tests, query instructions, and execution instructions to meet the needs of various scenarios.
Important:
1. Currently, AT commands are only supported on FreeRTOS.
2. Before using the AT command, please confirm whether the AT_SERVICE_CFG macro is set to 1. The SDK is generally turned off by default.
3. After the AT command is turned on, there will be less information printed when turning on the computer than before it was turned on, but the initialization process is the same.
Instruction Description
| type | Command format | illustrate |
|---|---|---|
| Query command | AT+<command name>? | Returns the current parameter value |
| Executing an order | AT+<command name>=<…> | Set user-defined parameter values |
Not every AT command has the above two types of commands. The input parameters in the command currently only support string parameters and integer numeric parameters.
- Parameters within angle brackets < > cannot be omitted.
- Parameters within square brackets [ ] can be omitted, and default values are used when omitted.
- The default baud rate for AT commands is 115200.
- The length of each AT command should not exceed 256 bytes.
- AT commands end with a new line (CR-LF), so the serial port tool should be set to “new line mode”.
- Special characters need to be escaped, such as ,,”, \, etc.
- \\: Escape backslash.
- \,: Escape commas. The commas separating parameters do not need to be escaped.
- \”: Escape double quotes, indicating that the double quotes of string parameters do not need to be escaped.
AT Message
There are two types of messages returned from the BK7238 command port: Passive responses and Active reports.
BK7238 Passive Response
Each input and each command will return a response, telling the sender the results of the execution of the command.
| AT Passive Response | Meaning |
|---|---|
| OK | After the AT command is processed, OK is returned. |
| ERROR | AT command error or error occurred during execution |
| SEND OK | Data has been sent to the protocol stack |
| SEND FAIL | An error occurred while sending data to the protocol stack |
| +<Command Name>:… | Detailed description of AT command processing results |
BK7238 Active Reporting
BK7238 will report important status changes or messages in the system during execution.
| AT message report | Meaning |
|---|---|
| ready | Wi-Fi softAP interface assigns an IP address to the station |
| bk_reboot | Restart the module now |
| WIFI CONNECTED | The Wi-Fi station interface is connected to the AP |
| WIFI GOT IP | The Wi-Fi station interface has obtained an IPv4 address |
| [<conn_id>,]CONNECT | Network connection with ID <conn_id> established (ID 0 by default) |
| [<conn_id>,]CLOSED | Network connection with ID <conn_id> has been disconnected (ID is 0 by default) |
| +STA_CONNECTED:<sta_mac> | Waiting for the user to enter data |
| +DIST_STA_IP:<sta_mac>,<sta_ip> | Wi-Fi softAP interface assigns an IP address to station |
| +STA DISCONNECTED: <sta_mac> | The station is disconnected from the Wi-Fi softAP interface of BK-AT |
| > | Waiting for the user to enter the data |
| +IPD | Data received from the network |
| +QUIT | Exit Wi-Fi transparent transmission mode |
| +MQTTCONNECTED | MQTT is connected to the broker |
| +MQTTDISCONNECTED | MQTT has been disconnected from the broker |
| +MQTTSUBRECV | MQTT has received data from the broker |
| +MQTTPUB:FAIL | MQTT failed to publish the data |
| +MQTTPUB:OK | MQTT publishing data completed |
| +BLECONN | Bluetooth LE connection established |
| +BLEDISCONN | Bluetooth LE connection lost |
| +READ | Read operations via Bluetooth LE connection |
| +WRITE | Writing via Bluetooth LE |
| +NOTIFY | BluetoothLE connected notification |
| +INDICATE | Indication from Bluetooth LE connection |
| +BLESECNTFYKEY | Bluetooth LE SMP key |
| +BLESECREQ:<conn_index> | Encrypted pairing request received from Bluetooth LE connection |
| +BLEAUTHCMPL:<conn_index>,<enc_result> | Bluetooth LE SMP pairing completed |
Basic instruction set
AT: Test AT startup
Command:
AT
Response:
OK
illustrate
- Test whether the AT command is valid
AT+RST: Restart the module
Command:
AT+RST
Response:
OK
AT+GMR: Display firmware version
Command:
AT+GMR
Response:
<ATVER>
<SDKVER>
AT+HELP: Display all supported commands
Command:
AT+HELP?
Response:
CMDRSP:cmd:<command>,help
AT+ USRRAM: Displays the RAM space available to the user
Command:
AT+USRRAM?
Response:
+USERRAM:value
OK
AT+GSLP: Enter Deep-sleep mode
Command:
AT+GSLP=<time>
Response:
<time>
OK
Parameter
- <time>: The length of time the device enters Deep-sleep, unit: milliseconds. After the set time is up, the device automatically wakes up, calls the deep sleep wake-up stub, and then loads the application.
ATE: Enable or disable AT echo function
Command:
ATE0
or
ATE1
Response:
OK
illustrate
- ATE0: Turn off echo and print log
- ATE1: Enable echo and print log
AT+UART_CUR: Set the current temporary configuration of UART without saving flash
Command:
AT+UART_CUR=<baudrate>,<databits>,<stopbits>,<parity>,<flow control>
Response:
OK
Parameter
- <baudrate>
: UART baud rate - The support range is 9600 ~ 2000000
- <databits>
: data bits - 5: 5 bit data bit
- 6: 6 bit data bits
- 7: 7 bit data bit
- 8: 8 bit number
- <stopbits>
: stop bits - 1: 1 bit stop bit
- 2: 2 bit stop bit
- <parity>
: check digit - 0: None
- 1:Odd
- 2:Even
- <flow control>
: flow control - 0: Disable flow control
- 1: Enable RTS
- 2: Enable CTS
- 3: Enable RTS and CTS at the same time
AT+UART_DEF: Set UART default configuration and save to flash
Command:
AT+UART_DEF?
Response:
+UART_DEF:<baudrate>,<databits>,<stopbits>,<parity>,<flow control> OK
Command:
AT+UART_DEF:<baudrate>,<databits>,<stopbits>,<parity>,<flow control>
Response:
OK
Parameter
- <baudrate>
: UART baud rate - The support range is 9600 ~ 2000000
- <databits>
: data bits - 5: 5 bit data bit
- 6: 6 bit data bits
- 7: 7 bit data bit
- 8: 8 bit number
- <stopbits>
: stop bits - 1: 1 bit stop bit
- 2: 2 bit stop bit
- <parity>
: check digit - 0: None
- 1:Odd
- 2:Even
- <flow control>
: flow control - 0: Disable flow control
- 1: Enable RTS
- 2: Enable CTS
- 3: Enable RTS and CTS at the same time
AT+SYSFLASH: View device flash partition table
Command:
AT+SYSFLASH?
Response:
<index>,< partition>,<dev>,< offset>,< length> OK
Parameter
- <index>: partition number
- <partition>: user partition name
- <dev>: physical device number
- <offset>: offset address
- <length>: data length
AT+SYSTIMESTAMP: Query/set local timestamp
Function:
- Query local timestamp
Command:
AT+SYSTIMESTAMP?
Response:
+SYSTIMESTAMP:<Unix_timestamp> OK
Function:
- Set the local timestamp. When the SNTP time is updated, the timestamp will be updated synchronously.
Command:
AT+SYSTIMESTAMP=<Unix_timestamp>
Response:
OK
Parameter
- <Unix-timestamp>: Unix timestamp, unit: seconds
Example:
AT+SYSTIMESTAMP=1686305483 //2023-6-9 10:11:23
AT+SLEEPPWCFG: Set Light-sleep wake-up source and wake-up GPIO
Command:
AT+SLEEPPWCFG= <wakeup source>,<param1>[,<param2>]
Response:
OK
Parameter
- <wakeup source>
: wakeup source - 0: Timer wake-up
- 1: Keep configuration
- 2: GPIO wake-up
- <param1>:+When the wakeup source specifies the timer to wake up, this parameter specifies the sleep time, units s +When the wakeup source specifies GPIO to wake up, this parameter defines the GPIO pin number (0~28)
- <param2>: When the wakeup source specifies GPIO for wake-up, this parameter defines the GPIO wake-up trigger mode.+0: rising edge trigger +1: falling edge trigger
Example:
RTC sleepAT+SLEEPPWCFG=0,2       //Automatically wake up in 2 seconds
GPIO sleepAT+SLEEPPWCFG=2,20,0   //GPIO20 rising edge wake-up
AT+SYSSTORE: Set parameter storage mode
Command:
AT+SYSSTORE?
Response:
+SYSSTORE:<store_mode> OK
Command:
AT+SYSSTORE=<store_mode>
Response:
OK
Parameter
- <store_mode>
: Parameter storage mode - 0: Command configuration is not stored in flash
- 1: The command configuration is stored in flash (default)
AT+RESTORE: Restore factory settings
Command:
AT+RESTORE
Response:
OK
illustrate
- This command will erase all parameters saved to flash and restore them to default parameters.
- Running this command will reboot the device.
AT+PRODUCTID: Set/query product ID
Command:
AT+PRODUCTID?
Response:
+PRODUCTID: <“productid”> OK
Command:
AT+PRODUCTID=<“productid”>
Response:
OK
Parameter
- <productid>: Product ID, maximum length 64 bytes
AT+DEVICENAME: Set/query device name
Command:
AT+DEVICENAME?
Response:
+DEVICENAME: <“devicename”> OK
Command:
AT+DEVICENAME=<“devicename”>
Response:
OK
Parameter
- <devicename>: device name, maximum length 64 bytes
AT+ REGION: Set/query the country where the device is located
Command:
AT+REGION?
Response:
+REGION: <”country”> OK
Command:
AT+REGION=<”country”>
Response:
OK
Parameter
- <REGION>: The country where the device is located, the maximum length is 64 bytes
AT+WORKMODE: Set/query the device working mode
Command:
AT+WORKMODE?
Response:
+WORKMODE: <mode> OK
Command:
AT+WORKMODE=<mode>
Response:
OK
Parameter
- <mode>:
- 0: Factory mode
- 1: Normal mode, only supports AT commands
illustrate
- Factory mode, with non-AT commands, supports kernel printing, RF parameter adjustment, and other functions. Normal mode is the normal working mode of the device. This mode only supports printing related to AT commands.
WiFi Command Set
AT+CWMODE: Set/query wifi working mode
Command:
AT+CCWMODE?
Response:
+CWMODE: <mode>,<auto_connect> OK
Command:
AT+CWMODE=<mode>[,<auto_connect>]
Response:
OK
Parameter
<mode>: mode - 0: No Wi-Fi mode, and Wi-Fi RF is turned off
- 1: Station mode
- 2: SoftAP mode
- 3: SoftAP+Station mode
- <auto_connect>
: - 0: Disable the function of automatically connecting to AP
- 1: Enable the function of automatically connecting to AP. If the configuration of automatically connecting to AP has been saved to flash before, it will automatically connect after restarting.
AT+CIPSTAMAC: Set/query the current WIFI MAC address
Command:
AT+CIPSTAMAC?
Response:
+WLMAC:<mac> OK
Command:
T+CIPSTAMAC=<"mac">
Response:
OK
Parameter
- <“mac”>: Supports two formats: “MM:MM:MM:MM:MM:MM” and “MM-MM-MM-MM-MM-MM”
AT+CWSAP: SoftAP Configuration Parameters
Command:
AT+CWSAP=<"ssid">,<"pwd">,<channel>,<ecn>[,max conn>][,<hidden>]
Response:
OK
Parameter
- <SSID>: string parameter, access point name
- <PWD>: string parameter, password, range: 8 ~ 64 bytes ASCII
- <CHANNELLl>: Channel number
- :
- 0: 802.11bgn protocol standard
- 1: 802.11bg protocol standard
- 2: 802.11b protocol standard
- <enc>
: encryption method, does not support WEP - 0 OPEN
- 1 WEP
- 2 WPA_TKIP
- 3WPA_AES
- 4 WPA2_TKIP
- 5 WPA2_AES
- 6 AES_TKIP_WPA2_MIXED
- 7 WPA3_SAE
- 8 WPA3_WPA2 (default)
- 9 EAPs
- 10 OWE
- 11 AUTO
- [<max conn>]: The maximum number of stations allowed to connect to SoftAP, value range: [1,3]
- [
]: - 0: broadcast SSID (default)
- 1: Do not broadcast the SSID
illustrate
- SoftAP is related to WLMODE configuration. SoftAP is enabled only when the mode parameter in WLMODE is configured to 2 or 3. The default SSID is bk7238.
AT+CWQIF: Stop SoftAP
Command:
AT+CWQIF
Response:
OK
AT+CIPAP: Configure SoftAP static IP and gateway
Command:
AT+CIPAP?
Response:
+CIPAP: <”ip”>,<”netmask”>,<”gateway”> OK
Command:
AT+CIPAP=<”ip”>,<”netmask”>,<”gateway”>
Response:
OK
Parameter
- <“ip”>: string parameter, indicating IPv4 address
- <“gateway”>: gateway
- <“netmask”>: subnet mask
AT+ CWLIF: Query device information connected to softap
Command:
AT+CWLIF
Response:
+CWLIF:<index>,<ip>,<mac>,<rssi> OK
Parameter
- <index>: Connection SoftAP serial number
- <ip>: gateway
- <mac>: subnet mask
- <rssi>: dns address
AT+WSCAN: Scan available APs
Command:
AT+WSCAN
Response:
CMDRSP: +WSCAN <ssid>,<bssid>,<channel>,<enc>,<rssi>
Parameter
- <ssid>: string parameter, SSID of AP
- <mac>: string parameter, MAC address of AP
- <channel>: subnet mask
: Encryption method - 0 OPEN
- 1 WEP
- 2 WPA_TKIP
- 3WPA_AES
- 4 WPA2_TKIP
- 5 WPA2_AES
- 6 AES_TKIP_WPA2_MIXED
- 7 WPA3_SAE
- 8 WPA3_WPA2 (default)
- 9 EAPs
- 10 OWE
- 11 AUTO
- <rssi>: signal strength
AT+CWDHCP: enable/disable DHCP
Command:
AT+CWDHCP?
Response:
<state>
Command:
AT+CWDHCP=<operate>,<mode>
Response:
OK
Parameter
- <operate>
: - 0: Disabled
- 1: enable
<m ode>: - Bit0: Station’s DHCP
- Bit1: DHCP for SoftAP
< state>: DHCP status - Bit0:
- 0: Disable Station’s DHCP
- 1: Enable Station’s DHCP
- Bit1:
- 0: Disable DHCP for SoftAP
- 1: Enable DHCP for SoftAP
- Bit0:
illustrate
- If AT+SYSSTORE=1, configuration changes will be saved to the NVS partition
Example
Enable:
AT+CWDHCP=1,1.    // Enable sta's DHCP
AT+CWDHCP=1,2     // Enable DHCP for ap
AT+CWDHCP=1,3     // Enable DHCP for sta+ap
Disabled:
AT+CWDHCP=0,1     // Disable sta's DHCP
AT+CWDHCP=0,2.    // Disable DHCP for ap
AT+CWDHCP=0,3     // Disable DHCP for sta+ap
AT+CWJAP: Station connects to AP
Command:
AT+CWJAP=[<ssid>],[<pwd>][,<bssid>][,<pci_en>][,<reconn_interval>][,<listen_interval>][,<scan_mode>][,<jap_timeout>][,<pmf>]
Response:
OK
WIFI CONNECTED
WIFI GOT IP
illustrate
- If AT+SYSSTORE=1, configuration changes will be saved to the NVS partition.
AT+CWQAP: Disconnect from AP
Command:
AT+CWQAP
Response:
OK
AT+CIPSTA: Query/set IP information of Station
Command:
AT+CIPSTA?
Response:
+CIPSTA:<ip>,<netmask>,<gateway>
Command:
AT+STASTATIC=<ip>,<netmask>,<gateway>
Response:
OK
Parameter
- <ip>: String parameter, representing the IPv4 address
- <gateway>: gateway
- <netmask>: subnet mask
TCP/IP command set
AT+ CIPSTATUS: Query TCP/UDP/SSL connection status and information
Command:
AT+CIPSTATUS?
Response:
+BIPSTATUS:<type>,<remoteip>,<port>,<localport>,<tetype>
Parameter
- <type>
: connection type - 0: “TCP”
- 1: “UDP”
- 2: “TLS”
- 3: “DTLS”
- <remoteip>: Remote connection IP
- <port>: Port for remote connection
- <localport>: the local port to connect to
< tetype>: - 0: device as client
- 1: Device as server
AT+CIPSTART: Establish TCP connection, UDP transmission or TLS connection
Command:
AT+CIPSTART=<linkID>,<"type">,<remotehost>,<remoteport>[,<keepalive>,"localport"],<"localip">
Response:
OK
Parameter
- <linkID>: Network connection ID (0 ~ 5), supports up to 6 connections
- <“type”>: connection type
- 0: “TCP”
- 1: “UDP”
- 2: “TLS”
- 3: “DTLS”
- <remotehost>: Remote connection IP
- <remoteport>: Port for remote connection
< keepalive>: TCP keep-alive interval, default value: 0 - 0: Disable TCP keep-alive function
- 1 ~ 7200: detection interval, unit: seconds
illustrate
- Only TCP is valid, UDP does not need to be set. This parameter will eventually be configured to the socket option TCP_KEEPIDLE, keepalive and other socket options.
- TCP_KEEPINTVL will use 1 by default, and TCP_KEEPCNT will use 3 by default.
- <“localport”>: Local port. This port needs to be set when it needs to be set as a server.
- <“localip”>: Local IP. This IP needs to be configured when it needs to be configured as a server.
Example
//1. Establish a TCP connection with a connection ID of 0 and keep-alive every 1800 seconds.
AT+CIPSTART=0,"tcp","192.168.0.103",20108,1800

//2. Establish a TCP Server connection with connection ID 1
AT+CIPSTART=2,"tcp","192.168.0.103",20108,1800, 5637, "192.168.0.107"

//3. Establish a UDP client connection with connection ID 1
AT+CIPSTART=1,"udp","192.168.0.103",20108

//4. Establish a UDP Server connection with connection ID 1 and local port 5637
AT+CIPSTART=1,"udp","192.168.0.103",20108,5637, "192.168.0.107"
AT+CIPSEND: Send data in normal transmission mode or Wi-Fi transparent transmission mode
Command:
// Execute TCP data sending
AT+CIPSEND=<linkID>,<length>

// Perform UDP data sending
AT+CIPSEND=<linkID>,<length>[,<"remotehost">,<remote port>]
Response:
>
The above response indicates that AT is ready to receive serial data. You can enter data at this time. When the length of data received by AT reaches <length>, data transmission begins. If the connection is not established or the connection is disconnected During data transmission, return:
CMDRSP:ERROR
If the data transfer is successful, return:
SEND OK
Function:
- Enter Wi-Fi transparent transmission mode
Command:
AT+CIPSEND
Response:
>
or
CMDRSP:ERROR
illustrate
- Entering Wi-Fi transparent transmission mode, the device can receive a maximum of 1024 bytes each time and send a maximum of 1460 bytes. If the length of the currently received data is greater than the maximum number of bytes sent, AT will send it immediately; otherwise, the received data will be sent within 20 ms. Sent within. When a single packet +++ is input, exit the data sending mode in transparent transmission mode. Please wait at least 1 second before sending the next AT command. This command must be used in transparent transmission mode and single connection.
Parameter
- <linkID>: Network connection ID (0 ~ 4), used for multiple connections
- <length>: data length, maximum value: 2048 bytes
- <“remote host”>: UDP transmission can specify the peer host: IPv4 address or domain name
- <remote port>: UDP transmission can specify the remote port
AT+CIPCLOSE: Close TCP/UDP/SSL connection
Command:
AT+CIPSEND=<linkID>
Response:
OK
parameteP
- <linkID>: The ID of the network connection that needs to be closed. If set to 5, it means closing all connections.
AT+CIPMUX: enable/disable multi-connection mode
Command:
AT+CIPMUX?
Response:
+CIPMUX:<mode> OK
Command:
AT+CIPMUX=<mode>
Response:
return:OK
Parameter
: connection mode, default value: 0 - 0: single connection
- 1: Multiple connections
illustrate
- Connection mode can only be changed when all connections are disconnected
- Only the normal transmission mode (AT+CIPMODE=0) can be set to multi-connection
AT+CIPMODE: Query/set transmission mode
Command:
AT+CIPMODE?
Response:
+CIPMODE:<mode> OK
Command:
AT+CIPMODE=<mode>
Response:
OK
Parameter
< :mode- 0: Normal transmission mode
- 1: Wi-Fi transparent transmission reception mode, only supports TCP single connection, UDP fixed communication peer, and SSL single connection.
AT+CIPSNTPCFG: Query/set NTP server
Command:
AT+CIPSNTPCFG?
Response:
+CIPSNTPCFG:<enable>,<timezone>,<SNTP server> OK
Command:
AT+CIPSNTPCFG=<enable>,<timezone>,<SNTP server>
Response:
OK
Parameter
: Set up the SNTP server: - 1: Set up SNTP server.
- 0: Do not set the SNTP server.
: - Value range: [-12,12], which is measured in hours and marks most time zones (UTC−12:00 to UTC+12:00) by offset from Coordinated Universal Time (UTC)
- [<SNTP server>]: SNTP server address or domain name.
Example:
// Enable SNTP server and set China time zone (UTC+08:00)
AT+CIPSNTPCFG=1,8,"cn.ntp.org.cn"

// Enable the SNTP server and set the time zone of New York, USA (UTC−05:00)
AT+CIPSNTPCFG=1,-5,"0.pool.ntp.org"
AT+CIPSNTPTIME: Query SNTP time
Command:
AT+CIPSNTPTIME?
Response:
+CIPSNTPTIME:<asctime style time> OK
Example:
AT+CIPSNTPTIME?
+CIPSNTPTIME:2022-10-21 19:20:39
OK
AT+PING: ping the peer host
Command:
AT+PING=<"host">
Response:
+PING:<time>
or
+PING:TIMEOUT
parameter
- <“host”>: String parameter, indicating the IPv4 address or domain name of the peer host.
- <time>: ping response time, unit: milliseconds.
AT+CIPDOMAIN: domain name resolution
Command:
AT+CIPDOMAIN=<"domain name">
Response:
+CIPDOMAIN:<"IP address"> OK
Parameter
- <“domain name”>: Domain name to be resolved
- <“IP address”>: The resolved IP address
illustrate
- Currently only supports resolution to IPv4 addresses
AT+CIPDNS: Query/set DNS server information
Command:
AT+CIPDNS?
Response:
+CIPDNS:<enable>[,<"DNS IP1">,<"DNS IP2">,<"DNS IP3">] OK
Command:
AT+CIPDNS=<enable>[,<"DNS IP1">,<"DNS IP2">,<"DNS IP3">]
Response:
OK
or
ERROR
Parameter
: Set up DNS - 0: Enable automatic acquisition of DNS settings, DNS will revert to 208.67.222.222, which will only take effect when DHCP is updated.
- 1: Enable manual setting of DNS information. If the value of parameter <DNS IPx> is not set, the default value 208.67.222.222 is used.
- <DNS IP1>: The first DNS IP address. This parameter is only valid for executing commands when the <enable> parameter is 1; that is, manual DNS settings are enabled.
- <DNS IP2>: The second DNS IP address. This parameter is only valid for executing commands when the <enable> parameter is 1; that is, manual DNS settings are enabled.
- <DNS IP3>: The third DNS IP address. This parameter is only valid for executing commands when the <enable> parameter is 1; that is, manual DNS settings are enabled.
illustrate
- If AT+SYSSTORE=1, configuration changes will be saved in the NVS area.
AT+CIPSSLCPSK: Query/set the PSK of the SSL client
Command:
AT+CIPSSLCPSK?
Response:
+CIPSSLCPSK:<linkID>,<"psk">,<"hint"> OK
Command:
// Single connection: (AT+CIPMUX=0)
AT+CIPSSLCPSK=<"psk">,<"hint">
// Multiple connections: (AT+CIPMUX=1)
AT+CIPSSLCPSK=<linkID>,<"psk">,<"hint">
Response:
OK
Parameter
- <linkID>: Network connection ID (0 ~ max). In the case of a single connection, the value of this parameter is 0; in the case of multiple connections, if the parameter value is set to max, it means all connections ; the default value of this parameter is 5.
- <“psk”>: PSK identity, maximum length: 48.
- <“hint”>: PSK hint, maximum length: 48.
illustrate
- If you want this configuration to take effect immediately, run this command before establishing an SSL connection.
AT+CIPDNS: Query/set DNS server information
Command:
AT+CIPDNS?
Response:
+CIPDNS:<enable>[,<"DNS IP1">,<"DNS IP2">,<"DNS IP3">] OK
Command:
AT+CIPDNS=<enable>[,<"DNS IP1">,<"DNS IP2">,<"DNS IP3">]
Response:
OK
or
ERROR
Parameter
: Set up DNS - 0: Enable automatic acquisition of DNS settings, DNS will be restored to 208.67.222.222, which will only take effect when DHCP is updated;
- 1: Enable manual setting of DNS information. If the value of parameter <DNS IPx> is not set, the default value 208.67.222.222 is used.
- <DNS IP1>: The first DNS IP address.
- <DNS IP2>: Second DNS IP address.
- <DNS IP3>: Third DNS IP address.
illustrate
- If AT+SYSSTORE=1, configuration changes will be saved in the NVS area.
- These three parameters cannot be set on the same server.
- When <enable> is 0, the DNS servers may change depending on the configuration of the router to which the device is connected.
MQTT instruction set
AT+MQTTUSERCFG: Set MQTT user attributes
Command:
AT+MQTTUSERCFG=<LinkID>,<scheme>,<"client_id">,<"username">,<"password">,<cert_key_ID>,<CA_ID>,<"path">
Response:
OK
parameter
- <LinkID>: Currently only link ID 0 is supported.
: - 1: MQTT over TCP
- 2: MQTT over TLS (PSK encryption)
- <client_id>: MQTT client ID, maximum length: 256 bytes.
- <username>: Username, used to log in to MQTT broker, maximum length: 64 bytes.
- <password>: Password, used to log in to MQTT broker, maximum length: 64 bytes.
- <cert_key_ID>: Certificate ID. Currently, cert certificates are not supported, and the parameter is 0.
- <CA_ID>: CA ID. Currently, CA certificates are not supported. The parameter is 0.
- <path>: Resource path, maximum length: 32 bytes.
illustrate
- The total length of each AT command cannot exceed 256 bytes.
AT+ MQTTCONNCFG: Set MQTT connection properties
Command:
AT+MQTTCONNCFG=<LinkID>,<keepalive>,<disable_clean_session>,<"lwt_topic">,<"lwt_msg">,<lwt_qos>,<lwt_retain>
Response:
OK
parameter
- <LinkID>: Currently only link ID 0 is supported.
- <keepalive>: MQTT ping timeout, unit: seconds. Range: [0,7200]. Default value: 0, will be forced to 120 seconds.
: Sets the MQTT clean session flag. - 0: Enable session cleanup
- 1: Disable cleaning session
- <lwt_topic>: Will topic, maximum length: 128 bytes.
- <lwt_msg>: will message, maximum length: 64 bytes.
- <lwt_qos>: Will QoS, optional parameters are 0, 1, 2, default value: 0.
- <lwt_retain>: will retain, parameter can be 0 or 1, default value: 0.
ExampleAT+MQTTCONNCFG=0,180,0,”test/aaa”,”good bye”,1,0
AT+MQTTCONN: Set MQTT connection properties
Command:
AT+MQTTCONN?
Response:
+MQTTCONN:<LinkID>,<state>,<scheme>,<"host">,<port>,<reconnect> OK
Command:
AT+MQTTCONN=<LinkID>,<host>,<port>,<reconnect>
Response:
OK
parameter
- <LinkID>: Currently only link ID 0 is supported.
- <host>: MQTT broker domain name or IP, maximum length: 64 bytes.
- <port>: MQTT broker port, maximum port: 65535.
: - 0: MQTT does not automatically reconnect
- 1: MQTT automatic reconnection
: MQTT state: - connected: connection successful
- disconnect: connection failed
: - 1: MQTT over TCP
- 2: MQTT over TLS (PSK encryption)
Example:
AT+MQTTCONN=0,192.168.0.102,8883,1
AT+MQTTPUB: publish MQTT message
Command:
AT+MQTTPUB=<linkID>,<"topic">,<"data">,<qos>,<retain>
Response:
OK
parameter
- <LinkID>: Currently only LinkID 0 is supported.
- <topic>: MQTT topic, maximum length: 128 bytes.
- <data>: MQTT string message.
- <qos>: QoS for publishing messages, the parameter can be 0, 1, or 2.
- <retain>: Release retain (0 or 1).
Example:
// Publish the string "987654321" message through the topic test/abc
AT+MQTTPUB=0,test/abc,987654321,1,0
AT+ MQTTPUBRAW: Publish MQTT messages (binary)
Command:
AT+MQTTPUBRAW=<linkid>,<"topic">,<length>,<qos>,<retain>
Response:
OK >
The symbol > indicates that AT is ready to receive serial port data. At this time, you can input data. When the data length reaches the value of parameter <length>, data transmission starts. If the transmission is successful, AT returns :+MQTTPUBRAW:OK
parameter
- <LinkID>: Currently only link ID 0 is supported.
- <topic>: MQTT topic, maximum length: 128 bytes.
- <length>: MQTT message length, the maximum length is 512 bytes.
- <qos>: QoS for publishing messages. The parameter can be 0, 1, or 2. The default value is 0.
- <retain>: Release retain.
AT+ MQTTSUB: Subscribe to MQTT Topic
Command:
AT+MQTTSUB?
Response:
+MQTTSUB:<linkid>,<status>,<topic1>,<“qos”> +MQTTSUB: <linkid>,<status>,<topic2>,<“qos”> OK
Command:
AT+MQTTSUB=<linkid>,<"topic">,<qos>
Response:
OK
parameter
- <LinkID>: Currently only link ID 0 is supported.
- <topic>: subscribed topic.
- <qos>: QoS of the subscription.
illustrate
When AT receives the MQTT message of the subscribed topic, it returns:+MQTTSUBRECV:<LinkID>,<“topic”>,<data_length>,data
If the topic has been subscribed, return:ALREADY SUBSCRIBE
AT+ MQTTUNSUB: Unsubscribe from MQTT Topic
Command:
AT+MQTTUNSUB=<linkID>,<”topic”>
Response:
OK
If the topic has not been subscribed or an MQTT connection has not been created, then:NO UNSUBSCRIBE OK
parameter
- <LinkID>: Currently only link ID 0 is supported.
- <topic>: MQTT topic, maximum length: 128 bytes.
AT+ MQTTCLEAN: Disconnect MQTT connection
Command:
AT+MQTTCLEAN=<LinkID>
Response:
OK
parameter
- <LinkID>: Currently only link ID 0 is supported.
HTTP command set
AT+HTTPCLIENT: Send HTTP client request
Command:
AT+HTTPCLIENT=<opt>,<content-type>,<url>,[<host>],[<path>],<transport_type>[,<data>][,<http_req_header>][,<http_req_header>][...]
Response:
+HTTPCLIENT:<size>,<data>
OK
//<size>:size is the length of the received data.
//<data>:data is the data responded by the server.
parameter
: HTTP client request method - 1: HEAD
- 2: GET
- 3: POST
- 4: PUT
- 5: DELETE
: Client request data type: - 0: application/x-www-form-urlencoded
- 1: application/json
- 2: multipart/form-data
- 3: text/xml
- <url>: HTTP URL. When the following <host> and <path> parameters are empty, this parameter will automatically overwrite these two parameters. <host>: domain name or IP address, <path>: HTTP path.
: HTTP client transport type, default value is 1: - 1: HTTP_TRANSPORT_OVER_TCP
- 2: HTTP_TRANSPORT_OVER_SSL
- <data>: When <opt> is a POST request, this parameter is the data sent to the HTTP server. When <opt> is not a POST request, this parameter is not present (that is, there is no need to enter a comma to indicate the presence of this parameter).
- <http_req_header>: Multiple request headers can be sent to the server.
illustrate
- If the url parameter is not empty, the HTTP client will use it and ignore the host parameter and path parameter; if the url parameter is omitted or the string is empty, the HTTP client will use the host parameter and the path parameter.
Example:
//HEAD
AT+HTTPCLIENT=1,0,http://httpbin.org/get,httpbin.org,/get,1

//GET
AT+HTTPCLIENT=2,0,http://httpbin.org/get,httpbin.org,/get,1

//POST
AT+HTTPCLIENT=3,0,http://httpbin.org/post,httpbin.org,/post,1,field1=value1&field2=value2

TLS
//GET
AT+HTTPCLIENT=2,0,https://www.baidu.com/,www.baidu.com,/,2

//POST
AT+HTTPCLIENT=3,0,https://www.baidu.com/,www.baidu.com,/,2,hello
AT+HTTPGETSIZE: Get HTTP Resource Size
Command:
AT+HTTPGETSIZE=<url>
Response:
+HTTPGETSIZE:<size>
OK
//<size>:The size of the url resource
parameter
- <url>: HTTP URL
Example:
AT+HTTPGETSIZE=http://www.baidu.com/img/bdlogo.gif
AT+HTTPCPOST: Post HTTP data of specified length
Command:
AT+HTTPCPOST=<url>,<length>[,<http_req_header_cnt>][,<http_req_header>..<http_req_header>]
Response:
OK >
The symbol > indicates that AT is ready to receive serial port data. You can input data at this time. When the data length reaches the value of parameter <length>, the serial port clicks to send the transmission data. If the transfer is successful, return: SEND OK
If the transmission fails, return: SEND FAIL
parameter
- <url>: HTTP URL
- <length>: HTTP data length required for POST. Maximum length 2k
- <http_req_header_cnt>: The number of <http_req_header> parameters
- [<http_req_header>]: Multiple request headers can be sent to the server
Example:
AT+HTTPCPOST=http://httpbin.org/post,27 > field1=value1&field2=value2
illustrate
- When post sends data, > cannot include \r\n when entering data later.
AT+HTTPCERT: Write CA certificate data to the device
Command:
AT+HTTPCERT=<type>,<length>
Response:
OK
parameter
: writing certificate method - 1: Write the certificate data ram according to the length of length.
- 2: Write the certificate data into ram according to the length of the data sent through the serial port.
- <length>: Set according to the value passed by type. If 1 is passed, you need to know the size of the certificate and pass the corresponding value. If 2 is passed, any value is acceptable, but all the certificate data needs to be sent at once. .
Example:
AT+HTTPSCERT=1,1280

-----BEGIN CERTIFICATE-----
MIIDdTCCAl2gAwIBAgILBAAAAAABFUtaw5QwDQYJKoZIhvcNAQEFBQAwVzELMAkG
A1UEBhMCQkUxGTAXBgNVBAoTEEdsb2JhbFNpZ24gbnYtc2ExEDAOBgNVBAsTB1Jv
b3QgQ0ExGzAZBgNVBAMTEkdsb2JhbFNpZ24gUm9vdCBDQTAeFw05ODA5MDExMjAw
MDBaFw0yODAxMjgxMjAwMDBaMFcxCzAJBgNVBAYTAkJFMRkwFwYDVQQKExBHbG9i
YWxTaWduIG52LXNhMRAwDgYDVQQLEwdSb290IENBMRswGQYDVQQDExJHbG9iYWxT
aWduIFJvb3QgQ0EwggEiMA0GCSqGSIb3DQEBAQUAA4IBDwAwggEKAoIBAQDaDuaZ
jc6j40+Kfvvxi4Mla+pIH/EqsLmVEQS98GPR4mdmzxzdzxtIK+6NiY6arymAZavp
xy0Sy6scTHAHoT0KMM0VjU/43dSMUBUc71DuxC73/OlS8pF94G3VNTCOXkNz8kHp
1Wrjsok6Vjk4bwY8iGlbKk3Fp1S4bInMm/k8yuX9ifUSPJJ4ltbcdG6TRGHRjcdG
snUOhugZitVtbNV4FpWi6cgKOOvyJBNPc1STE4U6G7weNLWLBYy5d4ux2x8gkasJ
U26Qzns3dLlwR5EiUWMWea6xrkEmCMgZK9FGqkjWZCrXgzT/LCrBbBlDSgeF59N8
9iFo7+ryUp9/k5DPAgMBAAGjQjBAMA4GA1UdDwEB/wQEAwIBBjAPBgNVHRMBAf8E
BTADAQH/MB0GA1UdDgQWBBRge2YaRQ2XyolQL30EzTSo//z9SzANBgkqhkiG9w0B
AQUFAAOCAQEA1nPnfE920I2/7LqivjTFKDK1fPxsnCwrvQmeU79rXqoRSLblCKOz
yj1hTdNGCbM+w6DjY1Ub8rrvrTnhQ7k4o+YviiY776BQVvnGCv04zcQLcFGUl5gE
38NflNUVyRRBnMRddWQVDf9VMOyGj/8N7yy5Y0b2qvzfvGn9LhJIZJrglfCm7ymP
AbEVtQwdpf5pLGkkeB6zpxxxYu7KyJesF12KwvhHhm4qxFYxldBniYUr+WymXUad
DKqC5JlR3XC321Y9YeRq4VzW9v493kHMB65jUr9TU/Qr6cf9tveCX4XSQRjbgbME
HMUfpIBvFSDJ3gyICh3WZlXi/EjJKSZp4A==
-----END CERTIFICATE-----

AT+HTTPSCERT=2,0

-----BEGIN CERTIFICATE-----
MIIDdTCCAl2gAwIBAgILBAAAAAABFUtaw5QwDQYJKoZIhvcNAQEFBQAwVzELMAkG
A1UEBhMCQkUxGTAXBgNVBAoTEEdsb2JhbFNpZ24gbnYtc2ExEDAOBgNVBAsTB1Jv
b3QgQ0ExGzAZBgNVBAMTEkdsb2JhbFNpZ24gUm9vdCBDQTAeFw05ODA5MDExMjAw
MDBaFw0yODAxMjgxMjAwMDBaMFcxCzAJBgNVBAYTAkJFMRkwFwYDVQQKExBHbG9i
YWxTaWduIG52LXNhMRAwDgYDVQQLEwdSb290IENBMRswGQYDVQQDExJHbG9iYWxT
aWduIFJvb3QgQ0EwggEiMA0GCSqGSIb3DQEBAQUAA4IBDwAwggEKAoIBAQDaDuaZ
jc6j40+Kfvvxi4Mla+pIH/EqsLmVEQS98GPR4mdmzxzdzxtIK+6NiY6arymAZavp
xy0Sy6scTHAHoT0KMM0VjU/43dSMUBUc71DuxC73/OlS8pF94G3VNTCOXkNz8kHp
1Wrjsok6Vjk4bwY8iGlbKk3Fp1S4bInMm/k8yuX9ifUSPJJ4ltbcdG6TRGHRjcdG
snUOhugZitVtbNV4FpWi6cgKOOvyJBNPc1STE4U6G7weNLWLBYy5d4ux2x8gkasJ
U26Qzns3dLlwR5EiUWMWea6xrkEmCMgZK9FGqkjWZCrXgzT/LCrBbBlDSgeF59N8
9iFo7+ryUp9/k5DPAgMBAAGjQjBAMA4GA1UdDwEB/wQEAwIBBjAPBgNVHRMBAf8E
BTADAQH/MB0GA1UdDgQWBBRge2YaRQ2XyolQL30EzTSo//z9SzANBgkqhkiG9w0B
AQUFAAOCAQEA1nPnfE920I2/7LqivjTFKDK1fPxsnCwrvQmeU79rXqoRSLblCKOz
yj1hTdNGCbM+w6DjY1Ub8rrvrTnhQ7k4o+YviiY776BQVvnGCv04zcQLcFGUl5gE
38NflNUVyRRBnMRddWQVDf9VMOyGj/8N7yy5Y0b2qvzfvGn9LhJIZJrglfCm7ymP
AbEVtQwdpf5pLGkkeB6zpxxxYu7KyJesF12KwvhHhm4qxFYxldBniYUr+WymXUad
DKqC5JlR3XC321Y9YeRq4VzW9v493kHMB65jUr9TU/Qr6cf9tveCX4XSQRjbgbME
HMUfpIBvFSDJ3gyICh3WZlXi/EjJKSZp4A==
-----END CERTIFICATE-----
AT+OTA: Device OTA upgrade
Command:
AT+OTA=<url>
Response:
OK // At the same time, download the upgrade file to FLASH. After the download is completed, start the bootloader to upgrade.
parameter
- <url>: HTTP URL of the upgrade file
Example:
AT+OTA=http://192.168.0.104/beken7231_bsp.rbl
AT+CWSTARTSMART: Equipment distribution network selection
Command:
AT+CWSTARTSMART=<type>,<auth floor>
Response:
OK
parameter
: type - 1:ble
- 2: AirKiss
- 3:ble+AirKiss
: Wi-Fi authentication mode threshold, this value is not used for the time being, the default is 0 - 0: OPEN (default)
- 1:WEP
- 2: WPA_PSK
- 3: WPA2_PSK
- 4: WPA_WPA2_PSK
- 5: WPA2_ENTERPRISE
- 6: WPA3_PSK
- 7: WPA2_WPA3_PSK
Example:
AT+CWSTARTSMART =1,0 AT+CWSTARTSMART =2,0 AT+CWSTARTSMART =3,0
illustrate
- The airkiss network configuration is through the airkiss network configuration in the common development tool for the Internet of Things in the WeChat applet. After the device sends the AT command, you can enter the account number and password in the applet.
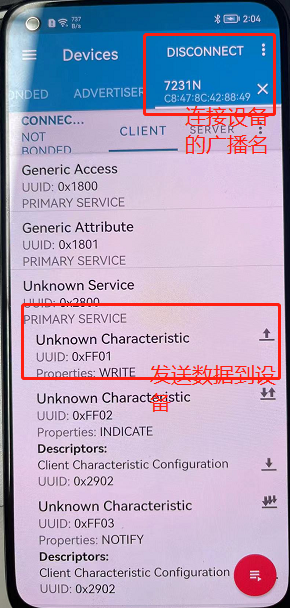
- For BLE distribution network, the device sends ble broadcast name 7238 through AT command. After NRF connect connects to the device’s Bluetooth broadcast, it chooses to send data to the device. The data format is TEXT. The data reference is as follows: 012TP-LINK_10860812345678
- The first byte is the data type, and the default is 0, which means sending the account number and password.
- The second three bytes are the ssid length ssid_len such as: 12.
- The fourth to Nth bytes are the string of ssid obtained through ssid, such as TP-LINK_1086.
- The ssid_len+3+1 bytes to ssid_len+3+2 bytes are the passwd length password_len such as: 08.
- Starting from the ssid_len+5+1 byte to ssid_len+5+1+password_len is the passwd string such as: 12345678.
The Ble distribution network operation is shown in the figure:

AT+CWSTOPSMART: Stop network distribution
Command:
AT+CWSTOPTSMART
Response:
OK
BLE command set
AT+BLEINIT: Bluetooth LE initialization
Command:
AT+BLEINIT?
If initialized, AT returns:
+BLEINIT:<role> OK
If not initialized, AT returns:
+BLEINIT:0 OK
Command:
AT+BLEINIT=<init>
Response:
OK
parameter
: - 0: Log out Bluetooth LE
- 1: client role
- 2: server role
illustrate
- Before using other Bluetooth LE commands, please call this command to initialize the Bluetooth LE role.
- After the Bluetooth LE role is initialized, it cannot be switched directly. If you need to switch roles, you need to call the AT+RST command to restart the system and then reinitialize the Bluetooth LE role.
- If you use BK7238 as Bluetooth LE server, you need to burn the service bin to flash: 0x1F8000. For how to generate the service bin file, please refer to tools/at_ble_service/readme.md.
- It is recommended to stop ongoing broadcasts, scans and disconnect all connections before logging out of Bluetooth LE.
Example:
AT+BLEINIT=1
AT+BLENAME: Bluetooth LE device name
Command:
AT+BLENAME?
Response:
+BLENAME:<device_name> OK
Command:
AT+BLENAME=<device_name>
Response:
OK
parameter
- <device_name>: Bluetooth LE device name, maximum length: 18.
Example:
AT+BLENAME="ble_demo"
AT+BLESCANPARAM: Query/set Bluetooth LE scanning parameters
Command:
AT+BLESCANPARAM?
Response:
+BLESCANPARAM:<scan_type>,<own_addr_type>,<filter_policy>,<scan_interval>,<scan_window> OK
Command:
AT+BLESCANPARAM=<scan_type>,<own_addr_type>,<filter_policy>,<scan_interval>,<scan_window>
Response:
OK
parameter
: scan type - 0: Passive scanning
- 1: Active scanning
: address type - 0: public address
- 1: Random address
- 2:RPA public address
- 3: RPA random address
- <filter_policy>: Scan filtering method, setting is not supported yet
- <scan_interval>: Scan interval. The value of this parameter should be greater than or equal to the <scan_window> parameter value. Parameter range: [0x0004,0x4000]. The scan interval is this parameter multiplied by 0.625 milliseconds, so the actual scan interval range is [2.5,10240] milliseconds.
- <scan_window>: Scan window. The value of this parameter should be less than or equal to the <scan_interval> parameter value. Parameter range: [0x0004,0x4000]. The scan window is this parameter multiplied by 0.625 milliseconds, so the actual scan window range is [2.5,10240] milliseconds.
Example:
AT+BLEINIT=1 //角色:客户端 AT+BLESCANPARAM=0,0,0,100,50
AT+BLESCAN: Enable Bluetooth LE scanning
Command:
AT+BLESCAN=<enable>[,<interval>][,<filter_type>,<filter_param>]
Response:
+BLESCAN:<addr>,<rssi>,<adv_data>,<scan_rsp_data>,<addr_type> OK
parameter
: - 1: Start continuous scanning
- 0: Stop continuous scanning
- [<interval>]: Scan duration, unit: seconds. Settings are not supported yet
- [
]: Filter options - 1: “MAC”
- 2: “NAME”
- [<filter_param>]: Filter parameter, indicating the MAC address or name of the other device
- <addr>: Bluetooth LE address
- <rssi>: signal strength
- <adv_data>: Broadcast data
- <scan_rsp_data>: Scan response data
- <addr_type>: broadcast device address type
illustrate
- Currently, filter_type and filter_param filter items are not supported yet.
- OK and +BLESCAN in the response:<addr>,<rssi>,<adv_data>,<scan_rsp_data>,<addr_type> have no strict order in the output order.
Example:
AT+BLEINIT=1            // Role: Client
AT+BLESCAN=1            // Start scanning
AT+BLESCAN=0            // Stop scanning
AT+BLESCAN=1,3,1,"24:0A:C4:96:E6:88"    // Start scanning, filter type is MAC address
AT+BLESCAN=1,3,2,"BK-AT"                // Start scanning, filter type is device name
AT+BLEADDR: Set Bluetooth LE device address
Command:
AT+BLEADDR?
Response:
+BLEADDR:<BLE_public_addr> OK
illustrate
- Setting the address type of the Bluetooth LE device does not support modification. The ble address is related to the wifi address. If you need to change it, please set the wifi address.
AT+BLESCANRSPDATA: Set Bluetooth LE scan response
Command:
AT+BLESCANRSPDATA=<scan_rsp_data>
Response:
OK
parameter
- <scan_rsp_data>: Scan response data, which is a HEX string. For example, if you want to set the scan response data to “0x11 0x22 0x33 0x44 0x55″, the command is AT+BLESCANRSPDATA=”1122334455”.
Example:
AT+BLEINIT=2
//Role: server
AT+BLESCANRSPDATA=050837323338
//short_name 7238
AT+BLEADVPARAM: Query/set Bluetooth LE broadcast parameters
Command:
AT+BLEADVPARAM?
Response:
+BLEADVPARAM:<adv_int_min>,<adv_int_max>,<adv_type>,<channel_map> OK
Command:
AT+BLEADVPARAM=<adv_int_min>,<adv_int_max>,<adv_type>[,<own_addr_type>],<channel_map>[,<adv_filter_policy>][,<peer_addr_type>,<peer_addr>]
Response:
OK
parameter
- <adv_int_min>: Minimum broadcast interval. Parameter range: [0x0020,0x4000]. The broadcast interval equals this parameter multiplied by 0.625 milliseconds, so the minimum broadcast interval range is [20,10240] milliseconds. The value of this parameter should be less than or equal to the <adv_int_max> parameter value.
- <adv_int_max>: Maximum broadcast interval. Parameter range: [0x0020,0x4000]. The broadcast interval equals this parameter multiplied by 0.625 milliseconds, so the maximum broadcast interval range is [20,10240] milliseconds. The value of this parameter should be greater than or equal to the <adv_int_min> parameter value.
: - 0: ADV_TYPE_IND
- 1: ADV_TYPE_DIRECT_IND_HIGH
- 2: ADV_TYPE_SCAN_IND
- 3: ADV_TYPE_NONCONN_IND
- 4: ADV_TYPE_DIRECT_IND_LOW
- [<own_addr_type>]: Setting is not supported yet
: broadcast channel - 1: ADV_CHNL_37
- 2: ADV_CHNL_38
- 4: ADV_CHNL_39
- 7: ADV_CHNL_ALL
- [<adv_filter_policy>]: Setting is not supported yet
- [<peer_addr_type>]: Setting is not supported yet
- [<peer_addr>]: Setting is not supported yet
- [<primary_phy>]: Setting is not supported yet
- [<secondary_phy>]: Setting is not supported yet
Example:
AT+BLEINIT=2 // Role: Server
AT+BLEADVPARAM=160,160,0,7
AT+BLEADVDATA: Set Bluetooth LE broadcast data
Command:
AT+BLEADVDATA=<adv_data>
Response:
OK
parameter
- <adv_data>: Broadcast data, which is a HEX string. For example, if you want to set the broadcast data “Local Name” to “7238_BLE”, the command is AT+BLEADVDATA=”0909373233385F424C45″.
illustrate
- If the broadcast data has been set previously using the command AT+BLEADVDATAEX=<dev_name>,<uuid>,<manufacturer_data>,<include_power>, it will be overwritten by the broadcast data set by this command.
- If you want to use this command to modify the device name, it is recommended to execute the AT+BLENAME command after executing this command to set the device name to the same name.
AT+BLEADVDATAEX: Automatically set Bluetooth LE broadcast data
Command:
AT+BLEADVDATAEX?
Response:
+BLEADVDATAEX:<dev_name>,<uuid>,<manufacturer_data>,<include_power> OK
Command:
AT+BLEADVDATAEX=<dev_name>,<uuid>,<manufacturer_data>,<include_power>
Response:
OK
parameter
- <dev_name>: String parameter, indicating the device name. For example, if the device name is set to “just-test”, the command is AT+BLEADVSTARTEX=”just-test”,<uuid>,< ;manufacturer_data>,<include_power>.
- <uuid>: String parameter. For example, if you want to set the UUID to “0xA002″, the command is AT+BLEADVSTARTEX=<dev_name>,”A002”,<manufacturer_data>,<include_power> .
- <manufacturer_data>: manufacturer data, which is a HEX string. For example, if you want to set the manufacturer data to “0x11 0x22 0x33 0x44 0x55″, the command is AT+BLEADVSTARTEX=<dev_name>,<uuid> ;,”1122334455”,<include_power>.
- <include_power>: Setting is not supported yet.
illustrate
- If the broadcast data has been set using the command AT+BLEADVDATA=<adv_data> before, it will be overwritten by the broadcast data set by this command.
Example:
AT+BLEINIT=2 // Role: Server
AT+BLEADVDATAEX="AT_DEMO","A002","0102030405",1
AT+BLEADVSTART: Start Bluetooth LE broadcast
Command:
AT+BLEADVSTART
Response:
OK
illustrate
- The default broadcast parameters are used if the command AT+BLEADVPARAM=<adv_parameter> is not used to set broadcast parameters.
- If the broadcast data is not set using the command AT+BLEADVDATA=<adv_data>, all 0 packets are sent. If the broadcast data has been set using the command AT+BLEADVDATA=<adv_data> before, it will be overwritten by the broadcast data set by AT+BLEADVDATAEX=<dev_name>,<uuid>,<manufacturer_data>,<include_power>. On the contrary, if AT+BLEADVDATAEX is used first, it will be overwritten by the broadcast data set by AT+BLEADVDATA.
- After turning on the Bluetooth LE broadcast, if no Bluetooth LE connection is established, the broadcast will continue; if a connection is established, the broadcast will automatically end.
Example:
AT+BLEINIT=2 // Role: Server
AT+BLEADVSTART
AT+BLEADVSTOP: Stop Bluetooth LE broadcast
Command:
AT+BLEADVSTOP
Response:
OK
illustrate
- If the Bluetooth LE connection is successfully established after starting the broadcast, the Bluetooth LE broadcast will automatically end without calling this command.
Example:
AT+BLEINIT=2 // Role: Server
AT+BLEADVSTART AT+BLEADVSTOP
AT+BLECONN: Establish Bluetooth LE connection
Command:
AT+BLECONN?
Response:
+BLECONN:<conn_index>,<remote_address> OK
If the connection is not established, the response does not display the <conn_index> and <remote_address> parameters.
Command:
AT+BLECONN=<conn_index>,<remote_address>[,<addr_type>,<timeout>]
Response:
If the connection is successfully established, it will prompt:
+BLECONN:<conn_index>,<remote_address> OK
If the connection fails to be established, it will prompt:
+BLECONN:<conn_index>,-1 ERROR
If the connection fails due to parameter errors or other reasons, it will prompt:
ERROR
parameter
- <conn_index>: Bluetooth LE connection number, range: [0,2].
- <remote_address>: The other party’s Bluetooth LE device address.
- [
]: Broadcast device address type, default value 0: - 0: Public Address
- 1: Random Address
- [<timeout>]: Setting is not supported yet, default is 5s
illustrate
- It is recommended that before establishing a new connection, run the AT+BLESCAN command to scan the device to ensure that the target device is in the broadcast state.
- If the Bluetooth LE server has been initialized and the connection has been successfully established, you can use this command to discover services among peer devices (GATTC).
Example
For testing here, you need to first use another board to turn on the server and turn on the broadcast.
AT+BLEINIT=1 // Role: Server
AT+BLECONN=0,"4988428C47C8",0,10
AT+BLECONNPARAM: Query/update Bluetooth LE connection parameters
Command:
AT+BLECONNPARAM?
Response:
+BLECONNPARAM:<conn_index>,<min_interval>,<max_interval>,<cur_interval>,<latency>,<timeout> OK
Command:
AT+BLECONNPARAM=<conn_index>,<min_interval>,<max_interval>,<latency>,<timeout>
Response:
OK
If the setting fails, the following message will be prompted:
+BLECONNPARAM: <conn_index>,-1
parameter
- <conn_index>: Bluetooth LE connection number, range: [0,2].
- <min_interval>: Minimum connection interval. The value of this parameter should be less than or equal to the <max_interval> parameter value. Parameter range: [0x0006,0x0C80]. The connection interval equals this parameter multiplied by 1.25 milliseconds, so the minimum connection interval range is [7.5,4000] milliseconds.
- <max_interval>: Maximum connection interval. The value of this parameter should be greater than or equal to the <min_interval> parameter value. Parameter range: [0x0006,0x0C80]. The connection interval equals this parameter multiplied by 1.25 milliseconds, so the maximum connection interval range is [7.5,4000] milliseconds.
- <cur_interval>: Current connection interval.
- <latency>: Latency. Parameter range: [0x0000,0x01F3].
- <timeout>: timeout. Parameter range: [0x000A,0x0C80]. The timeout equals this parameter multiplied by 10 milliseconds, so the actual timeout range is [100,32000] milliseconds.
illustrate
- This command requires a connection to be established first and only supports the client’s role in updating connection parameters.
Example:
AT+BLEINIT=1 //角色:客户端 AT+BLECONN=0,"24:0a:c4:09:34:23" AT+BLECONNPARAM=0,160,160,0,500
AT+BLEDISCONN: Disconnect Bluetooth LE
Command:
AT+BLEDISCONN=<conn_index>
Response:
OK // Receive
AT+BLEDISCONN
+BLEDISCONN:<conn_index>,<remote_address> // Running command successfully
parameter
- <conn_index>: Bluetooth LE connection number, range: [0,2].
- <remote_address>: The other party’s Bluetooth LE device address.
illustrate
- Only the client can run this command to disconnect.
Example:
AT+BLEINIT=1 // Role: Client
AT+BLECONN=0,"24:0a:c4:09:34:23"
AT+BLEDISCONN=0
AT+BLEDATALEN: Set Bluetooth LE data packet length
Command:
AT+BLEDATALEN=<conn_index>,<pkt_data_len>
Response:
OK
parameter
- <conn_index>: Bluetooth LE connection number, range: [0,2].
- <pkt_data_len>: Data packet length, range: [0x001B, 0x00FB].
illustrate
- A Bluetooth LE connection needs to be established before the packet length can be set.
Example:
AT+BLEINIT=1 //角色:客户端 AT+BLECONN=0,"24:0a:c4:09:34:23" AT+BLEDATALEN=0,30
AT+BLECFGMTU: Set Bluetooth LE MTU length
Command:
AT+BLECFGMTU?
Response:
+BLECFGMTU:<conn_index>,<mtu_size> OK
Command:
AT+BLECFGMTU=<conn_index>,<mtu_size>
Response:
OK // received this command
parameter
- <conn_index>: Bluetooth LE connection number, range: [0,2].
- <mtu_size>: Setting is not supported yet.
illustrate
- This command requires a Bluetooth LE connection to be established first.
- Only the client can run this command to set the MTU length.
- The actual length of the MTU needs to be negotiated. The OK response only indicates an attempt to negotiate the MTU length, so the set length may not take effect. It is recommended to call AT+BLECFGMTU? to query the actual MTU length.
Example:
AT+BLEINIT=1 // Role: Client
AT+BLECONN=0,"24:0a:c4:09:34:23" AT+BLECFGMTU=0,64
AT+BLEGATTSSRVCRE: GATTS creation service
Command:
AT+BLEGATTSSRVCRE
Response:
OK
illustrate
- To use bk7238 as a Bluetooth LE server to create a service, you need to burn the service bin file into flash. How to generate the service bin file, please refer to tools/at_ble_service/readme.md.
- After the Bluetooth LE server is initialized, please call this command promptly to create the service; if a Bluetooth LE connection is established first, the service cannot be created.
- If the Bluetooth LE client has been initialized successfully, you can use this command to create a service; you can also use some other corresponding GATTS commands, such as starting and stopping services, setting service characteristic values, and notification/indication. The specific commands are as follows:
- AT+BLEGATTSSRVCRE (recommended to be used before Bluetooth LE connection is established)
- AT+BLEGATTSSRVSTART (recommended before Bluetooth LE connection is established)
- AT+BLEGATTSSRV
- AT+BLEGATTSCHAR
- AT+BLEGATTSNTFY
- AT+BLEGATTSIND
- AT+BLEGATTSSETATTR
Example:
AT+BLEINIT=2 // Role: Server
AT+BLEGATTSSRVCRE
AT+BLEGATTSSRVSTART: GATTS starts service
Function:
- GATTS turns on all services
Command:
AT+BLEGATTSSRVSTART
Response:
OK
Function:
- GATTS starts a specified service
Command:
AT+BLEGATTSSRVSTART=<srv_index>
Response:
OK
parameter
- <srv_index>: Service serial number, starting from 1 and increasing.
Example:
Turn on all services:
AT+BLEINIT=2 // Role: Server
AT+BLEGATTSSRVCRE
AT+BLEGATTSSRVSTART
Turn on designated service No. 2:
AT+BLEINIT=2 // Role: Server
AT+BLEGATTSSRVCRE
AT+BLEGATTSSRVSTART=2
AT+BLEGATTSSRVSTOP: GATTS out of service
illustrates
- This command is not supported yet.
AT+BLEGATTSSRV: GATTS discovery service
Command:
AT+BLEGATTSSRV?
Response:
+BLEGATTSSRV:<srv_index>,<start>,<srv_uuid>,<srv_type> OK
parameter
- <srv_index>: Service serial number, starting from 1 and increasing.
: - 0: The service has not started;
- 1: Service has started.
- <srv_uuid>: UUID of the service.
: Type of service: - 0: secondary service;
- 1: Primary service.
Example:
AT+BLEINIT=2 // Role: Server
AT+BLEGATTSSRVCRE
AT+BLEGATTSSRV?
AT+BLEGATTSCHAR: GATTS discovery service characteristics
Command:
AT+BLEGATTSCHAR?
Response:
For service characteristic information, the response is as follows:
+BLEGATTSCHAR:"char",<srv_index>,<char_index>,<char_uuid>,<char_prop>
For descriptor information, the response is as follows:
+BLEGATTSCHAR:"desc",<srv_index>,<char_index>,<desc_index> OK
parameter
- <srv_index>: Service serial number, starting from 1 and increasing.
- <char_index>: The serial number of the service characteristic, starting from 1 and increasing.
- <char_uuid>: UUID of the service characteristic.
- <char_prop>: Properties of service characteristics.
- <desc_index>: Feature descriptor serial number.
- <desc_uuid>: UUID of the feature descriptor.
Example:
AT+BLEINIT=2 // Role: Server
AT+BLEGATTSSRVCRE
AT+BLEGATTSSRVSTART
AT+BLEGATTSCHAR?
AT+BLEGATTSNTFY: The server notifies the service characteristic value to the client
Function:
- The server notifies the service characteristic value to the client
Command:
AT+BLEGATTSNTFY=<conn_index>,<srv_index>,<char_index>,<length>
Response:
>
The symbol > indicates that AT is ready to receive serial port data. At this time, you can input data. When the data length reaches the value of parameter <length> or a carriage return and line feed (“rn”) is received, the notify operation is performed. If the data transfer is successful, it will prompt:OK
parameter
- <conn_index>: Bluetooth LE connection number, range: [0,2]. (invalid)
- <srv_index>: Service serial number, which can be queried by running AT+BLEGATTSCHAR?.
- <char_index>: The serial number of the service characteristic, which can be queried by running AT+BLEGATTSCHAR?.
- <length>: data length.
Example:
AT+BLEINIT=2 //Role: server
AT+BLEGATTSSRVCRE
AT+BLEGATTSSRVSTART
AT+BLEADVSTART //Start broadcasting. When the client is connected, it must be configured to receive notify.
AT+BLEGATTSCHAR? //Query the characteristics of the notify client (char_prop & 0x0010)
//For example, to use feature No. 2 of service No. 1 to notify data with a length of 4 bytes, use the following command:
AT+BLEGATTSNTFY=0,1,2,4
//Prompt: After the ">" symbol, enter 4-byte data, such as "1234", and then the data will be automatically transmitted
AT+BLEGATTSIND: The server indicates the service characteristic value to the client
Command:
AT+BLEGATTSIND=<conn_index>,<srv_index>,<char_index>,<length>
Response:
>
The symbol > indicates that AT is ready to receive serial port data. At this time, you can input data. When the data length reaches the value of parameter <length> or a carriage return and line feed (“rn”) is received, the indicated operation is performed. If the data transfer is successful, it will prompt: OK
parameter
- <conn_index>: Bluetooth LE connection number, range: [0, 2].
- <srv_index>: Service serial number, which can be queried by running AT+BLEGATTSCHAR?.
- <char_index>: The serial number of the service characteristic, which can be queried by running AT+BLEGATTSCHAR?.
- <length>: data length.
Example:
AT+BLEINIT=2 //Role: server
AT+BLEGATTSSRVCRE
AT+BLEGATTSSRVSTART
AT+BLEADVSTART //Start broadcasting. When the client is connected, it must be configured to receive indication.
AT+BLEGATTSCHAR? //Query the characteristics that the client can receive indication (char_prop & 0x0020)
//For example, to use the No. 1 feature of Service No. 2 to indicate data with a length of 5 bytes, the command is as follows:
AT+BLEGATTSIND=0,2,1,5
//Prompt: After the ">" symbol, enter 5 bytes of data, such as "54123", and then the data will be automatically transmitted
AT+BLEGATTSSETATTR: GATTS set service characteristic value
illustrate
- This command is not supported yet.
AT+BLEGATTCPRIMSRV: GATTC discovery basic services
Command:
AT+BLEGATTCPRIMSRV=<conn_index>
Response:
+BLEGATTCPRIMSRV:<conn_index>,<srv_index>,<srv_uuid>,<srv_type> OK
parameter
- <conn_index>: Bluetooth LE connection number, range: [0,2]. (obtained automatically, the setting value does not take effect)
- <srv_index>: Service serial number, starting from 1 and increasing.
- <srv_uuid>: UUID of the service.
: Type of service: - 0: secondary service;
- 1: Primary service.
illustrate
- To use this command, you need to establish a Bluetooth LE connection first.
Example:
AT+BLEINIT=1
AT+BLECONN=0,"24:12:5f:9d:91:98"
AT+BLEGATTCPRIMSRV=1
AT+BLEGATTCCHAR: GATTC discovery service characteristics
Command:
AT+BLEGATTCCHAR=<conn_index>,<srv_index>
Response:
For service characteristic information, the response is as follows:
+BLEGATTCCHAR:"char",<conn_index>,<srv_index>,<char_index>,<char_uuid>,<char_prop>
For descriptor information, the response is as follows:
+BLEGATTCCHAR:"desc",<conn_index>,<srv_index>,<char_index>,<desc_index>,<desc_uuid> OK
parameter
- <conn_index>: Bluetooth LE connection number, range: [0,2]. (obtained automatically, the setting value does not take effect)
- <srv_index>: Service serial number, which can be queried by running AT+BLEGATTCPRIMSRV=<conn_index>.
- <char_index>: The serial number of the service characteristic, starting from 0 and increasing.
- <char_uuid>: UUID of the service characteristic.
- <char_prop>: Properties of service characteristics.
- <desc_index>: Feature descriptor serial number.
- <desc_uuid>: UUID of the feature descriptor.
illustrate
- To use this command, you need to establish a Bluetooth LE connection first.
Example:
AT+BLEINIT=1 //Role: client
AT+BLECONN=0,"24:12:5f:9d:91:98"
AT+BLEGATTCPRIMSRV=0
AT+BLEGATTCCHAR=0,1 //Specify index query based on the query result of the previous command
AT+BLEGATTCRD: GATTC reads service characteristic value
Command:
AT+BLEGATTCRD=<conn_index>,<srv_index>,<char_index>[,<desc_index>]
Response:
+BLEGATTCRD:<conn_index>,<len>,<value> OK
parameter
- <conn_index>: Bluetooth LE connection number, range: [0,2].
- <srv_index>: Service serial number, which can be queried by running AT+BLEGATTCPRIMSRV=<conn_index>.
- <char_index>: service characteristic serial number, which can be queried by running AT+BLEGATTCCHAR=<conn_index>, <srv_index>.
- [
]: Feature descriptor number: - If set, read the value of the target descriptor;
- If not set, reads the value of the target characteristic.
- <len>: data length.
- <value>: <char_value> or <desc_value>.
- <char_value>: service characteristic value, string format, run AT+BLEGATTCRD=<conn_index>, <srv_index>, <char_index> to read. For example, if the response is +BLEGATTCRD:0,1,0, it means that the data length is 1 and the content is “0”.
- <desc_value>: The value of the service characteristic descriptor, in string format, read by running AT+BLEGATTCRD= <conn_index>,<srv_index>,<char_index>,<desc_index>. For example, if the response is +BLEGATTCRD:0,4,0123, it means that the data length is 4 and the content is “0123”.
illustrate
- To use this command, you need to establish a Bluetooth LE connection first.
- If the target service characteristic does not support read operations, “ERROR” is returned.
Example:
AT+BLEINIT=1 //Role: client
AT+BLECONN=0,"24:12:5f:9d:91:98"
AT+BLEGATTCPRIMSRV=0
AT+BLEGATTCCHAR=0,3
//Based on the query result of the previous command, specify the index query (readable char_prop & 0x2)
//For example, to read the No. 3 feature of Service No. 2, the command is as follows:
AT+BLEGATTCRD=0,2,3
AT+BLEGATTCWR: GATTC write service characteristic value
Command:
AT+BLEGATTCWR=<conn_index>,<srv_index>,<char_index>[,<desc_index>],<length>
Response:
>
The symbol > indicates that AT is ready to receive serial port data. At this time, you can input data. When the data length reaches the value of parameter <length>, the write operation is performed. If the data transfer is successful, it will prompt: OK
parameter
- <conn_index>: Bluetooth LE connection number, range: [0,2].
- <srv_index>: Service serial number, which can be queried by running AT+BLEGATTCPRIMSRV=<conn_index>.
- <char_index>: service characteristic serial number, which can be queried by running AT+BLEGATTCCHAR=<conn_index>, <srv_index>.
- [
]: Feature descriptor number: - If set, writes the value of the target descriptor;
- If not set, the value of the target feature is written.
- <length>: data length.
illustrate
- To use this command, you need to establish a Bluetooth LE connection first.
- If the target service characteristic does not support write operations, “ERROR” is returned.
Example:
AT+BLEINIT=1 //Role: client
AT+BLECONN=0,"24:12:5f:9d:91:98"
AT+BLEGATTCPRIMSRV=0
AT+BLEGATTCCHAR=0,3
//Based on the query result of the previous command, specify the index query (char_prop & 0x8 can be written)
//For example, to write 6-byte data to feature No. 1 of service No. 3, the command is as follows:
AT+BLEGATTCWR=0,3,1,6
//Prompt: After the ">" symbol, just enter 6 bytes of data, such as "123456", and then start writing
*Beken is the official brand name of Bekencorp